[vc_row full_width=”stretch_row” full_height=”yes” equal_height=”yes” content_placement=”middle”][vc_column width=”1/2″][vc_column_text]
How to Submit The First Samples To The customer?
Today, you’ll learn exactly how to submit the first samples to the customer. And present a professional image of your company.
We’ve used the steps in this post to win customers’ confidence and get repeat RFQs.[/vc_column_text][/vc_column][vc_column width=”1/2″][vc_single_image image=”3829″ img_size=”full”][/vc_column][/vc_row][vc_row equal_height=”yes” content_placement=”middle” css=”.vc_custom_1693891602203{margin-top: 100px !important;margin-bottom: 100px !important;}”][vc_column width=”1/2″][vc_column_text]Congratulations! A new customer has issued you a Purchase Order.
The prospects look promising.
He asked for five samples first. Then he shall green light the mass production.[/vc_column_text][/vc_column][vc_column width=”1/2″][vc_single_image image=”3940″ img_size=”large”][/vc_column][/vc_row][vc_row equal_height=”yes” content_placement=”middle” css=”.vc_custom_1693891615652{margin-top: 100px !important;margin-bottom: 100px !important;}”][vc_column width=”1/2″][vc_column_text]During the last few weeks, You’ve worked hard and produced the samples. It’s time now to submit the first samples to the customer.
So, what is your plan? How will you submit samples?
✔️ Just pack them in a carton and FedEx or UPS or DHL them to the customer?
I don’t suggest you should do this. Here is the reason why.[/vc_column_text][/vc_column][vc_column width=”1/2″][vc_single_image image=”3948″ img_size=”full”][/vc_column][/vc_row][vc_row equal_height=”yes” content_placement=”middle” css=”.vc_custom_1693890348523{background-color: #eeee22 !important;}”][vc_column][vc_column_text]Well, the first impression is the lasting impression. What’s more.
So it is worth giving it a professional outlook. It shall also make the client’s decision easy.
Here is what I would do:[/vc_column_text][/vc_column][/vc_row][vc_row css=”.vc_custom_1693891666823{margin-top: 200px !important;margin-bottom: 40px !important;}”][vc_column][vc_column_text]
Step 1: Identify the samples.
I mean, give them a unique number (1,2,3…) or a unique alphabet (a,b,c…)
Here are a few Do’s and Don’ts
[/vc_column_text][/vc_column][/vc_row][vc_row equal_height=”yes” content_placement=”middle”][vc_column][vc_separator][/vc_column][/vc_row][vc_row equal_height=”yes” content_placement=”middle” css=”.vc_custom_1693892592969{margin-top: 100px !important;margin-bottom: 100px !important;}”][vc_column width=”1/2″][vc_column_text]❌ Please don’t write an identification mark using a permanent marker or paint or ink or anything else (until not asked by the customer).[/vc_column_text][/vc_column][vc_column width=”1/2″][vc_single_image image=”3951″ img_size=”full”][/vc_column][/vc_row][vc_row equal_height=”yes” content_placement=”middle”][vc_column][vc_separator][/vc_column][/vc_row][vc_row equal_height=”yes” content_placement=”middle” css=”.vc_custom_1693892603001{margin-top: 100px !important;margin-bottom: 100px !important;}”][vc_column width=”1/2″][vc_column_text]✅ Paste removable stickers and write on the stickers. [/vc_column_text][/vc_column][vc_column width=”1/2″][vc_single_image image=”3952″ img_size=”full”][/vc_column][/vc_row][vc_row equal_height=”yes” content_placement=”middle”][vc_column][vc_separator][/vc_column][/vc_row][vc_row equal_height=”yes” content_placement=”middle” css=”.vc_custom_1693892614171{margin-top: 100px !important;margin-bottom: 100px !important;}”][vc_column width=”1/2″][vc_column_text]✅ Sometimes, if pasting the sticker isn’t possible, tie the identification label and part by a thread or a metal wire. [/vc_column_text][/vc_column][vc_column width=”1/2″][vc_single_image image=”3953″ img_size=”full”][/vc_column][/vc_row][vc_row equal_height=”yes” content_placement=”middle”][vc_column][vc_separator][/vc_column][/vc_row][vc_row equal_height=”yes” content_placement=”middle” css=”.vc_custom_1693892623850{margin-top: 100px !important;margin-bottom: 100px !important;}”][vc_column width=”1/2″][vc_column_text]✅ Another idea is to keep a single sample in one zip-lock pouch and make identification on the pouch.[/vc_column_text][/vc_column][vc_column width=”1/2″][vc_single_image image=”3954″ img_size=”full”][/vc_column][/vc_row][vc_row css=”.vc_custom_1693892663212{margin-top: 100px !important;margin-bottom: 0px !important;}”][vc_column][vc_column_text]
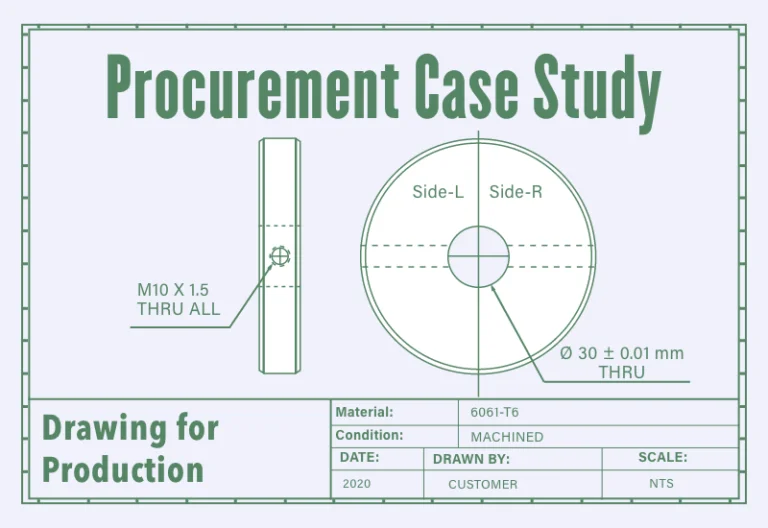
Step 2: Prepare a Ballooned Drawing
[/vc_column_text][/vc_column][/vc_row][vc_row equal_height=”yes” content_placement=”middle” css=”.vc_custom_1693892673727{margin-top: 100px !important;margin-bottom: 200px !important;}”][vc_column width=”1/2″][vc_column_text]
Ballooning the Drawing
The serial numbers in the red border boxes (in the drawing on the right side) are called Balloons.
The process of assigning a unique serial number to each drawing dimension or specification is called ‘Ballooning’.
During ballooning, you assign a unique number to each dimension or specification that requires measurement & record it in the inspection report.
Therefore a ballooned drawing is where each ‘to be controlled dimension or specification’ is assigned a unique number.
⚠️ Use the customer’s drawing for Ballooning or Numbering.
It may happen that you use the mks system in your company. However, the customer’s drawing is in the fps system.
So customer shall verify your samples against his drawing only.[/vc_column_text][/vc_column][vc_column width=”1/2″][vc_single_image image=”2165″ img_size=”full”][/vc_column][/vc_row][vc_row css=”.vc_custom_1693891435346{margin-top: 100px !important;margin-bottom: 30px !important;}”][vc_column][vc_column_text]
Step 3: Prepare the Inspection Report
[/vc_column_text][/vc_column][/vc_row][vc_row equal_height=”yes” content_placement=”middle”][vc_column width=”1/2″][vc_column_text]
Explain your understanding of why the samples are okay?
✅ A few vital points for the Inspection Report:
- Part Name
- Drawing Revision Number
- Name of the Inspector and approver
- Date
- List all the measured dimensions, tolerances (Lower & Upper),
- Unit of measurement— Keep the same as the customer’s drawing.
- Device Name
- Sample identification
[/vc_column_text][/vc_column][vc_column width=”1/2″][vc_single_image image=”3965″ img_size=”full”][/vc_column][/vc_row][vc_row equal_height=”yes” content_placement=”middle”][vc_column][vc_separator][/vc_column][/vc_row][vc_row equal_height=”yes” content_placement=”middle” css=”.vc_custom_1693892374085{margin-top: 100px !important;margin-bottom: 100px !important;}”][vc_column width=”1/2″][vc_column_text]✅ List all the measured values sample-wise (as per the sample identification number)[/vc_column_text][/vc_column][vc_column width=”1/2″][vc_single_image image=”3963″ img_size=”full”][/vc_column][/vc_row][vc_row equal_height=”yes” content_placement=”middle”][vc_column][vc_separator][/vc_column][/vc_row][vc_row equal_height=”yes” content_placement=”middle” css=”.vc_custom_1693892408789{margin-top: 100px !important;margin-bottom: 100px !important;}”][vc_column width=”1/2″][vc_column_text]✅ Next, make sure that the actual measured values of the sample are listed in the respective sample column only. It shouldn’t happen that you write the measurements of sample # 4 in the column of sample #5.[/vc_column_text][/vc_column][vc_column width=”1/2″][vc_single_image image=”3971″ img_size=”full”][/vc_column][/vc_row][vc_row equal_height=”yes” content_placement=”middle” css=”.vc_custom_1693892424968{margin-bottom: 0px !important;}”][vc_column][vc_separator][/vc_column][/vc_row][vc_row equal_height=”yes” content_placement=”middle” css=”.vc_custom_1693892434002{margin-top: 100px !important;margin-bottom: 100px !important;}”][vc_column width=”1/2″][vc_column_text]✅ Please attach the clear ballooned drawing.
If you don’t know the ballooned drawing or need a sample Inspection report. Download here.[/vc_column_text][/vc_column][vc_column width=”1/2″][vc_single_image image=”2165″ img_size=”full”][/vc_column][/vc_row][vc_row equal_height=”yes” content_placement=”middle” css=”.vc_custom_1693892442349{margin-bottom: 0px !important;}”][vc_column][vc_separator][/vc_column][/vc_row][vc_row equal_height=”yes” content_placement=”middle” css=”.vc_custom_1693892455205{margin-top: 200px !important;margin-bottom: 100px !important;}”][vc_column width=”1/2″][vc_column_text]
A few caution points:
— If the drawing requires Raw Material grade, please attach relevant reports of chemical composition, mechanical properties, heat treatment microstructure etc.
— Note: If the drawing mentions weight, please include weight detail in the inspection report.
— Last but not least, you must mention your judgement (OK, Not-OK etc.) in each row. Very Important.[/vc_column_text][/vc_column][vc_column width=”1/2″][vc_single_image image=”3969″ img_size=”full”][/vc_column][/vc_row][vc_row equal_height=”yes” content_placement=”middle” css=”.vc_custom_1693892464759{margin-bottom: 100px !important;}”][vc_column][vc_separator][/vc_column][/vc_row][vc_row][vc_column][vc_column_text]— In the end, print these documents, sign & stamp them and put them along with the identified samples in the same box/package.
Note: Sharing these documents by email is good only when you send the originals and samples. [/vc_column_text][/vc_column][/vc_row][vc_row equal_height=”yes” content_placement=”middle” css=”.vc_custom_1693892464759{margin-bottom: 100px !important;}”][vc_column][vc_separator][/vc_column][/vc_row][vc_row][vc_column][vc_column_text]Follow APOGEE Sourcing on LinkedIn[/vc_column_text][/vc_column][/vc_row][vc_row css=”.vc_custom_1693893264322{margin-top: 200px !important;}”][vc_column width=”2/3″][vc_column_text]Know the Author[/vc_column_text][/vc_column][vc_column width=”1/3″][vc_raw_html]JTNDZGl2JTIwY2xhc3MlM0QlMjJiYWRnZS1iYXNlJTIwTEktcHJvZmlsZS1iYWRnZSUyMiUyMGRhdGEtbG9jYWxlJTNEJTIyZW5fVVMlMjIlMjBkYXRhLXNpemUlM0QlMjJsYXJnZSUyMiUyMGRhdGEtdGhlbWUlM0QlMjJsaWdodCUyMiUyMGRhdGEtdHlwZSUzRCUyMkhPUklaT05UQUwlMjIlMjBkYXRhLXZhbml0eSUzRCUyMnJham5lZXNoLWt1bWFyLWFwb2dlZSUyMiUyMGRhdGEtdmVyc2lvbiUzRCUyMnYxJTIyJTNFJTNDYSUyMGNsYXNzJTNEJTIyYmFkZ2UtYmFzZV9fbGluayUyMExJLXNpbXBsZS1saW5rJTIyJTIwaHJlZiUzRCUyMmh0dHBzJTNBJTJGJTJGaW4ubGlua2VkaW4uY29tJTJGaW4lMkZyYWpuZWVzaC1rdW1hci1hcG9nZWUlM0Z0cmslM0Rwcm9maWxlLWJhZGdlJTIyJTNFUmFqbmVlc2glMjBLdW1hciUzQyUyRmElM0UlM0MlMkZkaXYlM0UlMEElMjAlMjAlMjAlMjAlMjAlMjAlMjAlMjAlMjAlMjAlMjAlMjAlMjAlMjA=[/vc_raw_html][vc_raw_js]JTNDc2NyaXB0JTIwc3JjJTNEJTIyaHR0cHMlM0ElMkYlMkZwbGF0Zm9ybS5saW5rZWRpbi5jb20lMkZiYWRnZXMlMkZqcyUyRnByb2ZpbGUuanMlMjIlMjBhc3luYyUyMGRlZmVyJTIwdHlwZSUzRCUyMnRleHQlMkZqYXZhc2NyaXB0JTIyJTNFJTNDJTJGc2NyaXB0JTNF[/vc_raw_js][/vc_column][/vc_row]